Article:
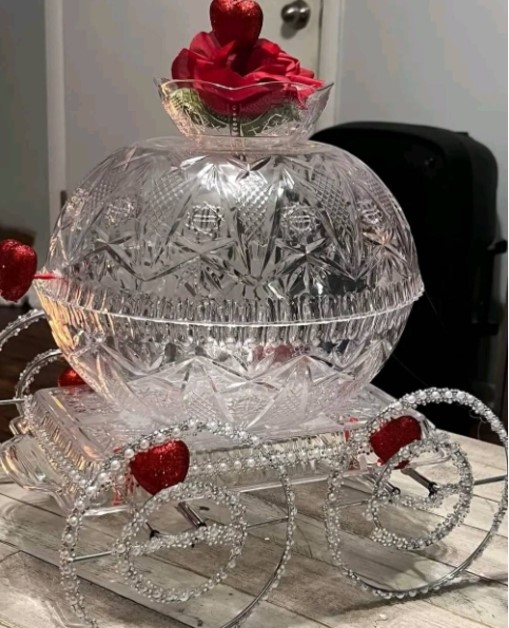
Turn heads at your next event with this stunning DIY crystal carriage centerpiece. Perfect for weddings, baby showers, or fairy tale-themed parties, this piece is elegant, creative, and easy to assemble. It’s sure to make your table the star of the occasion!
Materials Needed:
- Two crystal bowls (one smaller and one larger)
- A decorative base (e.g., a mirrored tray or acrylic block)
- Decorative metal or wire wheels
- Faux jewels, rhinestones, or glitter adhesive strips
- Hot glue gun and glue sticks
- Red foam hearts or floral embellishments
- Decorative wire for handles and accents
Step-by-Step Instructions:
- Build the Carriage Body:
Place the smaller crystal bowl upside down on top of the larger crystal bowl to form the shape of a carriage. Use a hot glue gun to secure the two bowls together. - Prepare the Base:
Attach the bowls to a sturdy decorative base, like a mirrored tray or acrylic block. This will provide stability and elevate the carriage. - Attach the Wheels:
Glue four decorative wheels onto the base using a hot glue gun. You can use pre-made craft wheels or create your own from sturdy decorative wire wrapped in faux jewels or rhinestones. - Add Embellishments:
Wrap the edges of the wheels and base with glitter adhesive strips or rhinestones for a luxurious look. - Top It Off:
Place a faux flower or foam heart on top of the carriage for a royal finishing touch. Add smaller decorative accents around the base to tie the theme together. - Final Details:
Use decorative wire to craft carriage handles or additional accents on the sides. Make sure everything is securely glued and aligned for a polished finish.
Pro Tips:
- Use color-coordinated embellishments to match your event’s theme.
- Opt for battery-operated fairy lights inside the crystal bowls for a glowing effect.
- Use high-quality materials to give the centerpiece a sophisticated feel.

